
Appearance
Create a Token
Create a new token and register it in a single flow. Chain Daddy deploys a standard ERC-20 (or SPL on Solana) contract with the full supply sent directly to your wallet, then files your verified ownership on-chain automatically.
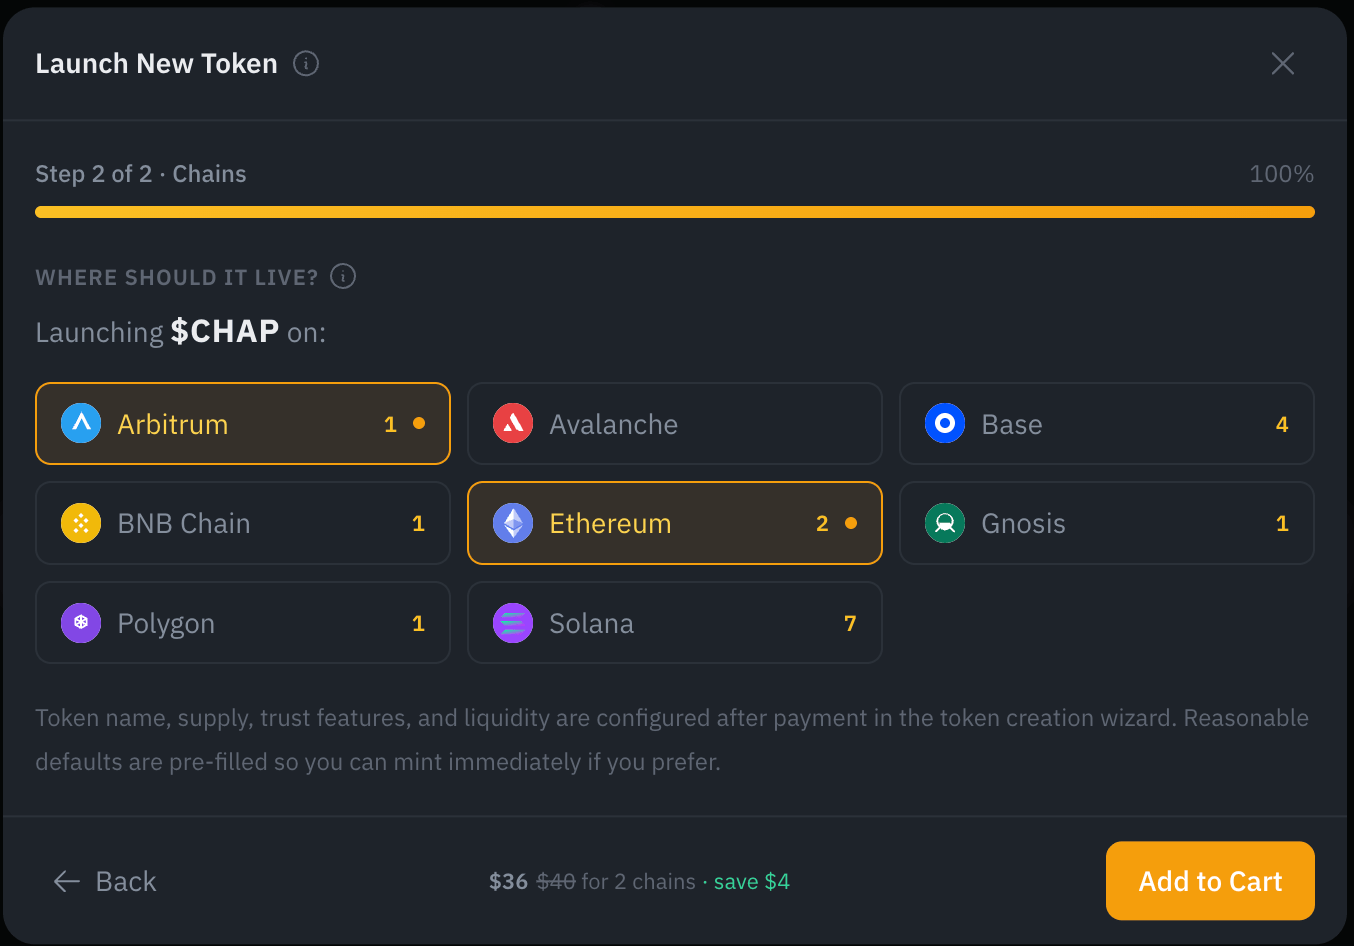
Getting started takes two quick steps: from the homepage, hit Launch New Token, name your ticker, pick your chains, and Add to Cart. You configure the token itself — supply, settings, liquidity — in the wizard after checkout.
Step 1 — Name it. Enter your ticker symbol (for example CHAPY). You'll set the longer display name, supply, and everything else after checkout.
Step 2 — Pick your chains. Choose one or more chains. Multi-chain selections get an automatic bundle discount, shown live in the footer — then Add to Cart and check out.
Name already taken? We'll tell you.
If a ticker is already in use, the chain picker shows how many tokens we found going by that name on each chain — so you can see at a glance where $YOURS is contested before you commit. (First-claim-wins is per symbol and chain, so a name taken on one chain may still be open on another.)
Why Make a Token?
A token turns your idea, community, or inside joke into something people can actually hold, trade, and rally around — and it's unmistakably yours. You claim the ticker, the full supply lands in your wallet, and your verified ownership is filed on-chain automatically, so when someone searches $YOURS they find the real one, not a copycat.
No Solidity, no deploy scripts, no gatekeepers. It takes about two minutes and works on every major chain.
What Gets Deployed
Each token creation deploys:
- Standard ERC-20 contract on your chosen chain(s)
- Full supply to your wallet: you control 100% of tokens
- On-chain registration: your verified ownership record is filed automatically; no separate step
- Cross-chain linking configured: if deploying to multiple chains
The deployed token is a standard, audited contract with no admin keys or special permissions beyond what you configure at creation time.
Pricing
Token creation combines a flat per-chain token-deployment fee with the standard registration fee. Ethereum costs more than other chains due to gas. Multi-chain bundles (Duo / Tri / Quad / All-Chain / All-Chain + ETH) bundle both into a single discounted price.
OG Discount
OG-eligible projects pay no platform fee for the registration portion. The token-deployment fee still applies.
For the current per-chain rates and bundle prices, see Registration & Creation Pricing.
What's Included
Every token creation includes:
- Token contract deployment on selected chain(s)
- On-chain registration listed under your wallet as the verified owner
- Cross-chain linking (multi-chain bundles)
- Public token page with editable metadata
- Listing export data for major platforms
Which Chain Should I Choose?
Each blockchain has different strengths. Here's a quick summary to help you pick, with links to learn more about each chain.
Solana, Most Popular
Best for: High-speed trading and meme coins
Near-instant transactions with fees under a penny. Solana has the largest retail trader community and the most active on-chain trading volume. If your community is already on Solana or you want the fastest trading experience, start here.
Ethereum, Most Established
Best for: Maximum credibility and institutional presence
The original smart contract platform. Ethereum mainnet carries the most prestige but has significantly higher gas costs (the Ethereum token-creation fee reflects this — see pricing). Best for established projects that want the strongest on-chain credibility.
Arbitrum, Low Cost, Big Ecosystem
Best for: Most projects getting started
Low fees (usually under $0.10 per transaction), fast confirmations, and the strongest on-chain finance ecosystem of any Layer 2. Arbitrum inherits Ethereum's security while keeping costs low. A great default for new projects.
Base, Built by Coinbase
Best for: Consumer apps and social tokens
Built by the team at Coinbase, Base has low fees and a growing user base focused on consumer-friendly apps. Great choice if your audience is newer to crypto or already uses Coinbase.
Polygon, Widely Supported
Best for: High-volume and gaming projects
Very low fees and supported by virtually every wallet and platform. Polygon has strong adoption in gaming and NFT communities. Good choice if you expect high transaction volume.
BNB Chain, Powered by Binance
Best for: Global reach and exchange-backed ecosystem
One of the largest blockchain ecosystems by user count, especially popular in Asia. Low fees and broad exchange support. Choose BNB Chain if your community is already active there.
Avalanche, Fast & Scalable
Best for: High-throughput and subnet-ready projects
Sub-second finality and a scalable subnet architecture. Avalanche offers fast transaction speeds with low costs and a growing ecosystem of trading and gaming projects.
Gnosis, Community Powered
Best for: DAO-focused and community-governed projects
Home of Safe (formerly Gnosis Safe), the most popular multi-sig wallet. Gnosis Chain is community-governed with ultra-low fees paid in xDAI. A natural fit for DAO-native projects and community-first tokens.
Go Multi-Chain
Launch on Multiple Chains
You don't have to pick just one. Multi-chain tokens reach more traders, more exchanges, and more communities. Chain Daddy handles the cross-chain linking automatically, so your token page shows a unified view across all your deployments.
Multi-chain bundles are discounted compared to deploying chains individually. See Registration & Creation Pricing for current rates.
Creation Wizard
After checkout, a guided wizard walks you through configuring your token before it mints — identity, supply, token settings, trust features, liquidity, and a final review — with your progress saved at every step. Reasonable defaults are pre-filled, so you can accept them and mint immediately, or fine-tune any step.
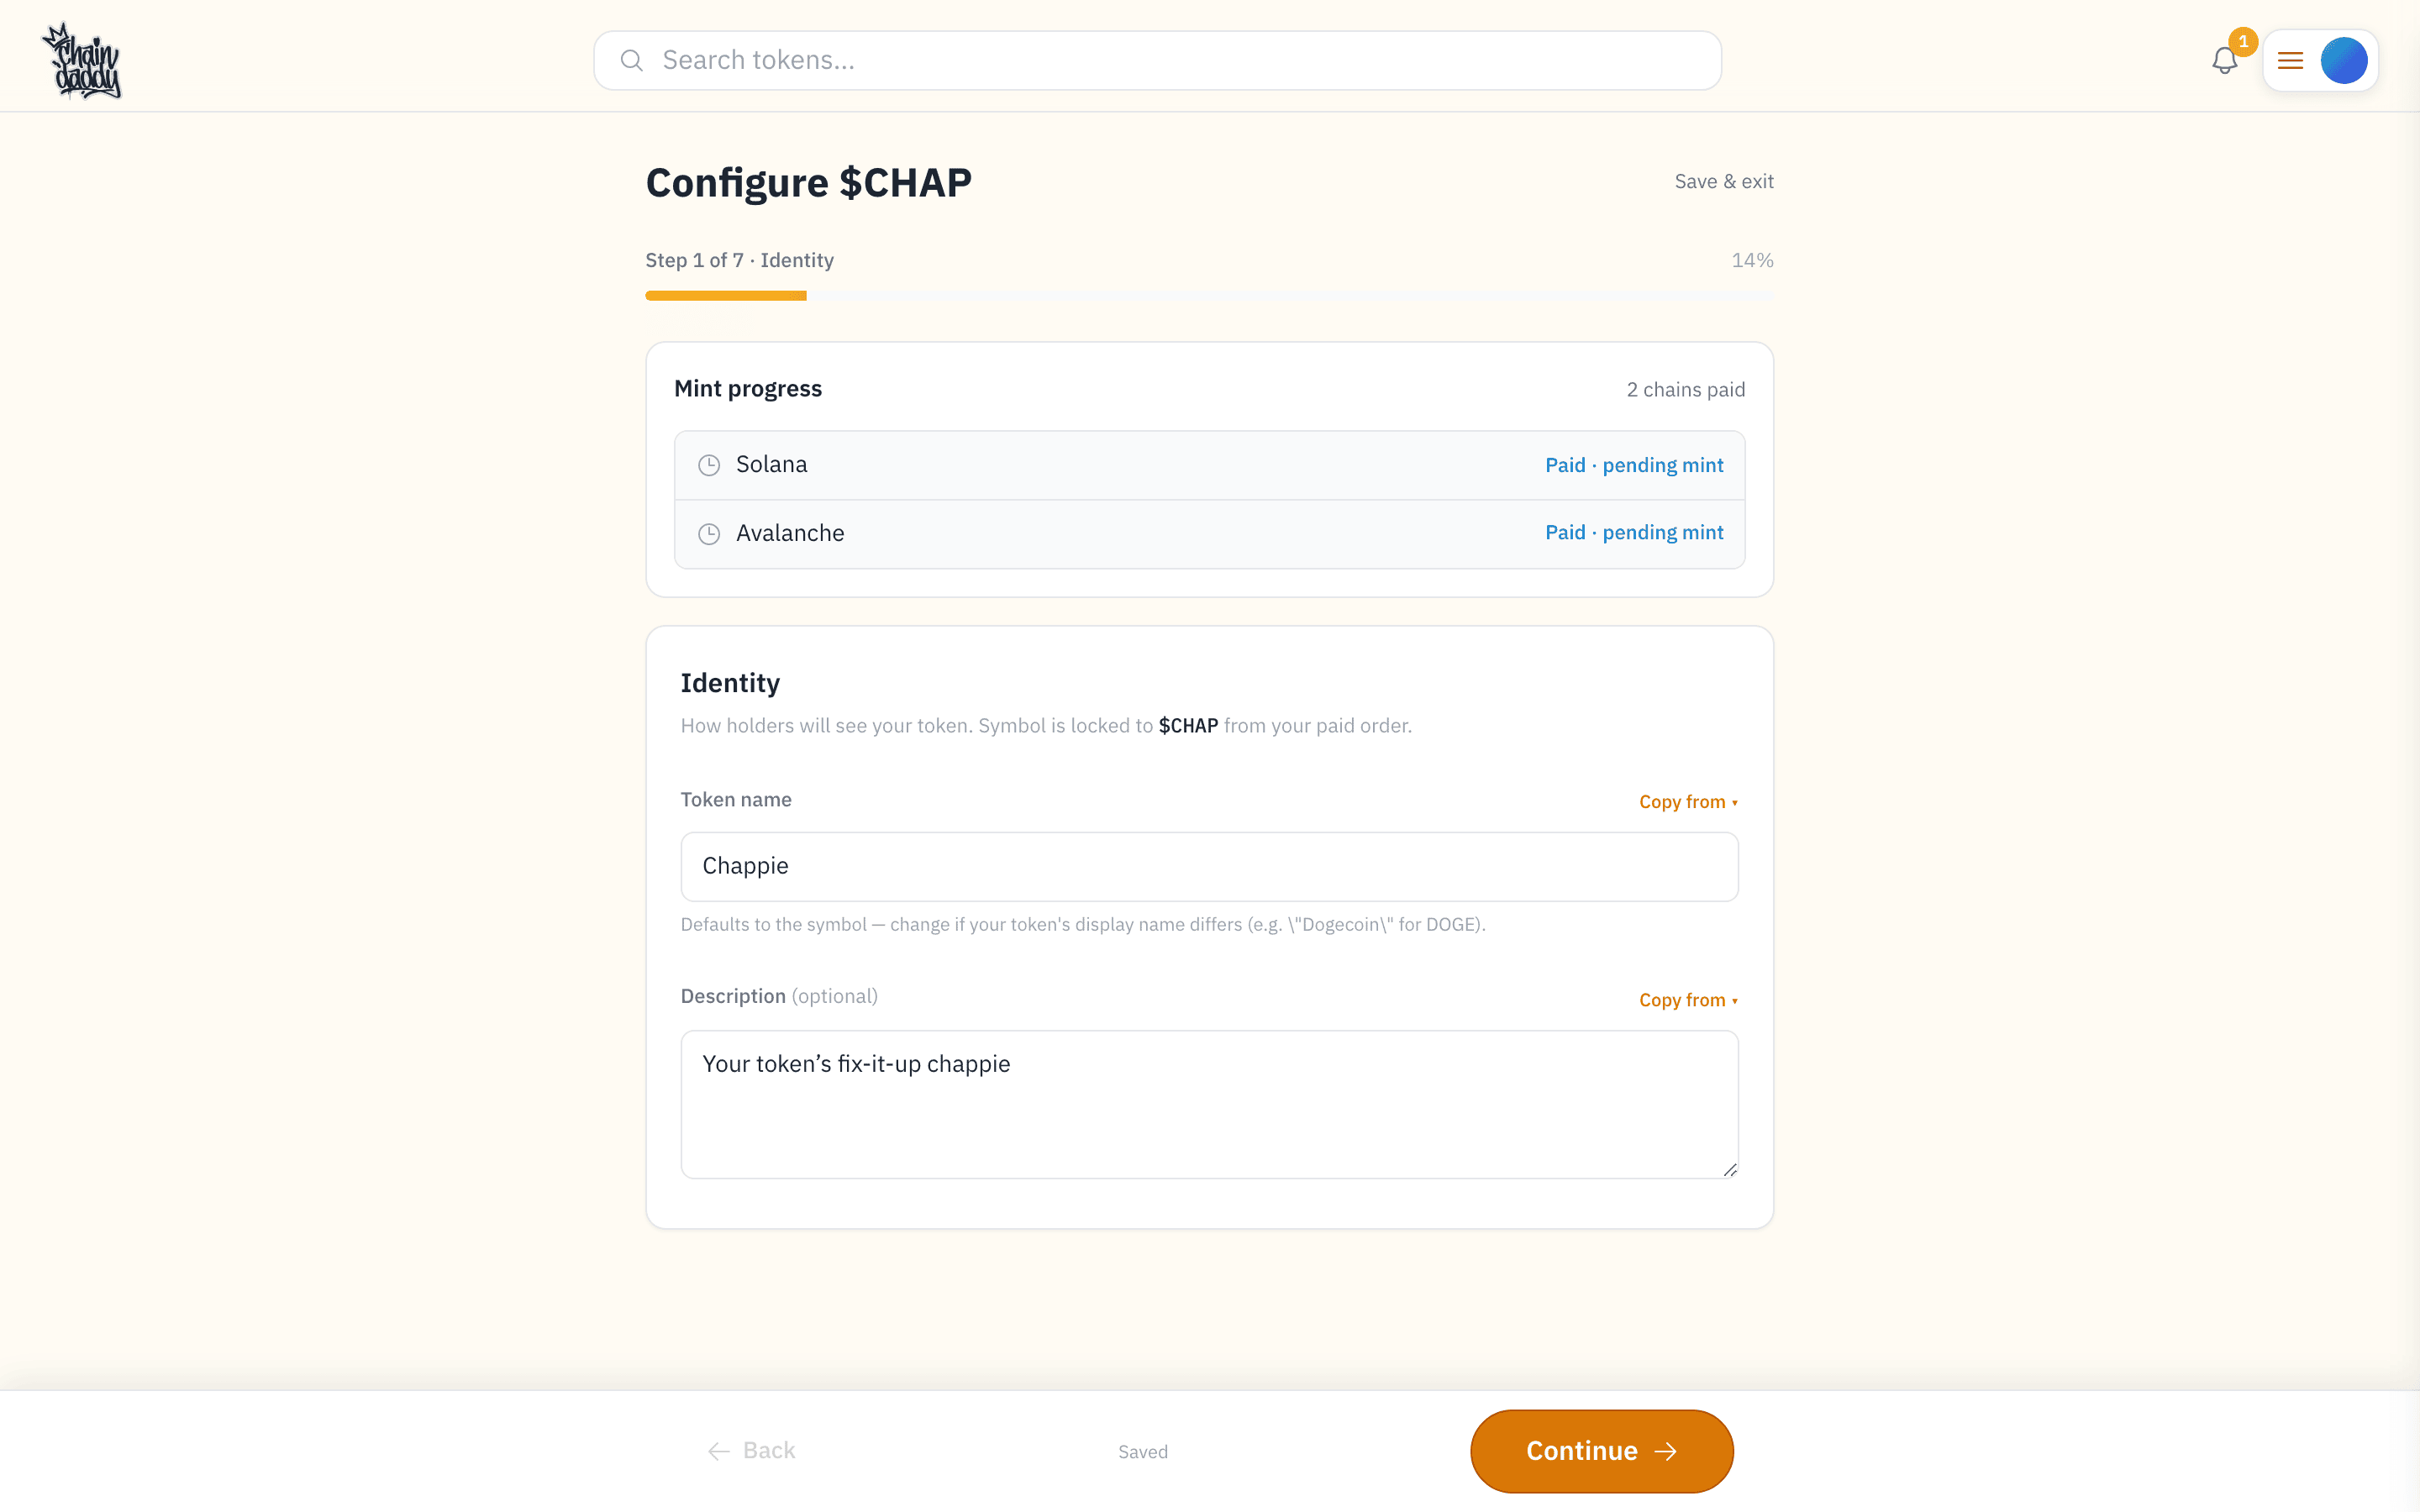
Configuring a token across the wizard's steps — the symbol is locked to your paid order, and everything else has a sensible default you can change.
Step 1: Identity
Name your token and give it a one-line description. The symbol is locked to your paid order; the name defaults to the symbol — change it if your token's display name differs (e.g. "Dogecoin" for DOGE). The description is optional: a one-liner marketplaces and search can show next to your token.
Step 2: Supply & Precision
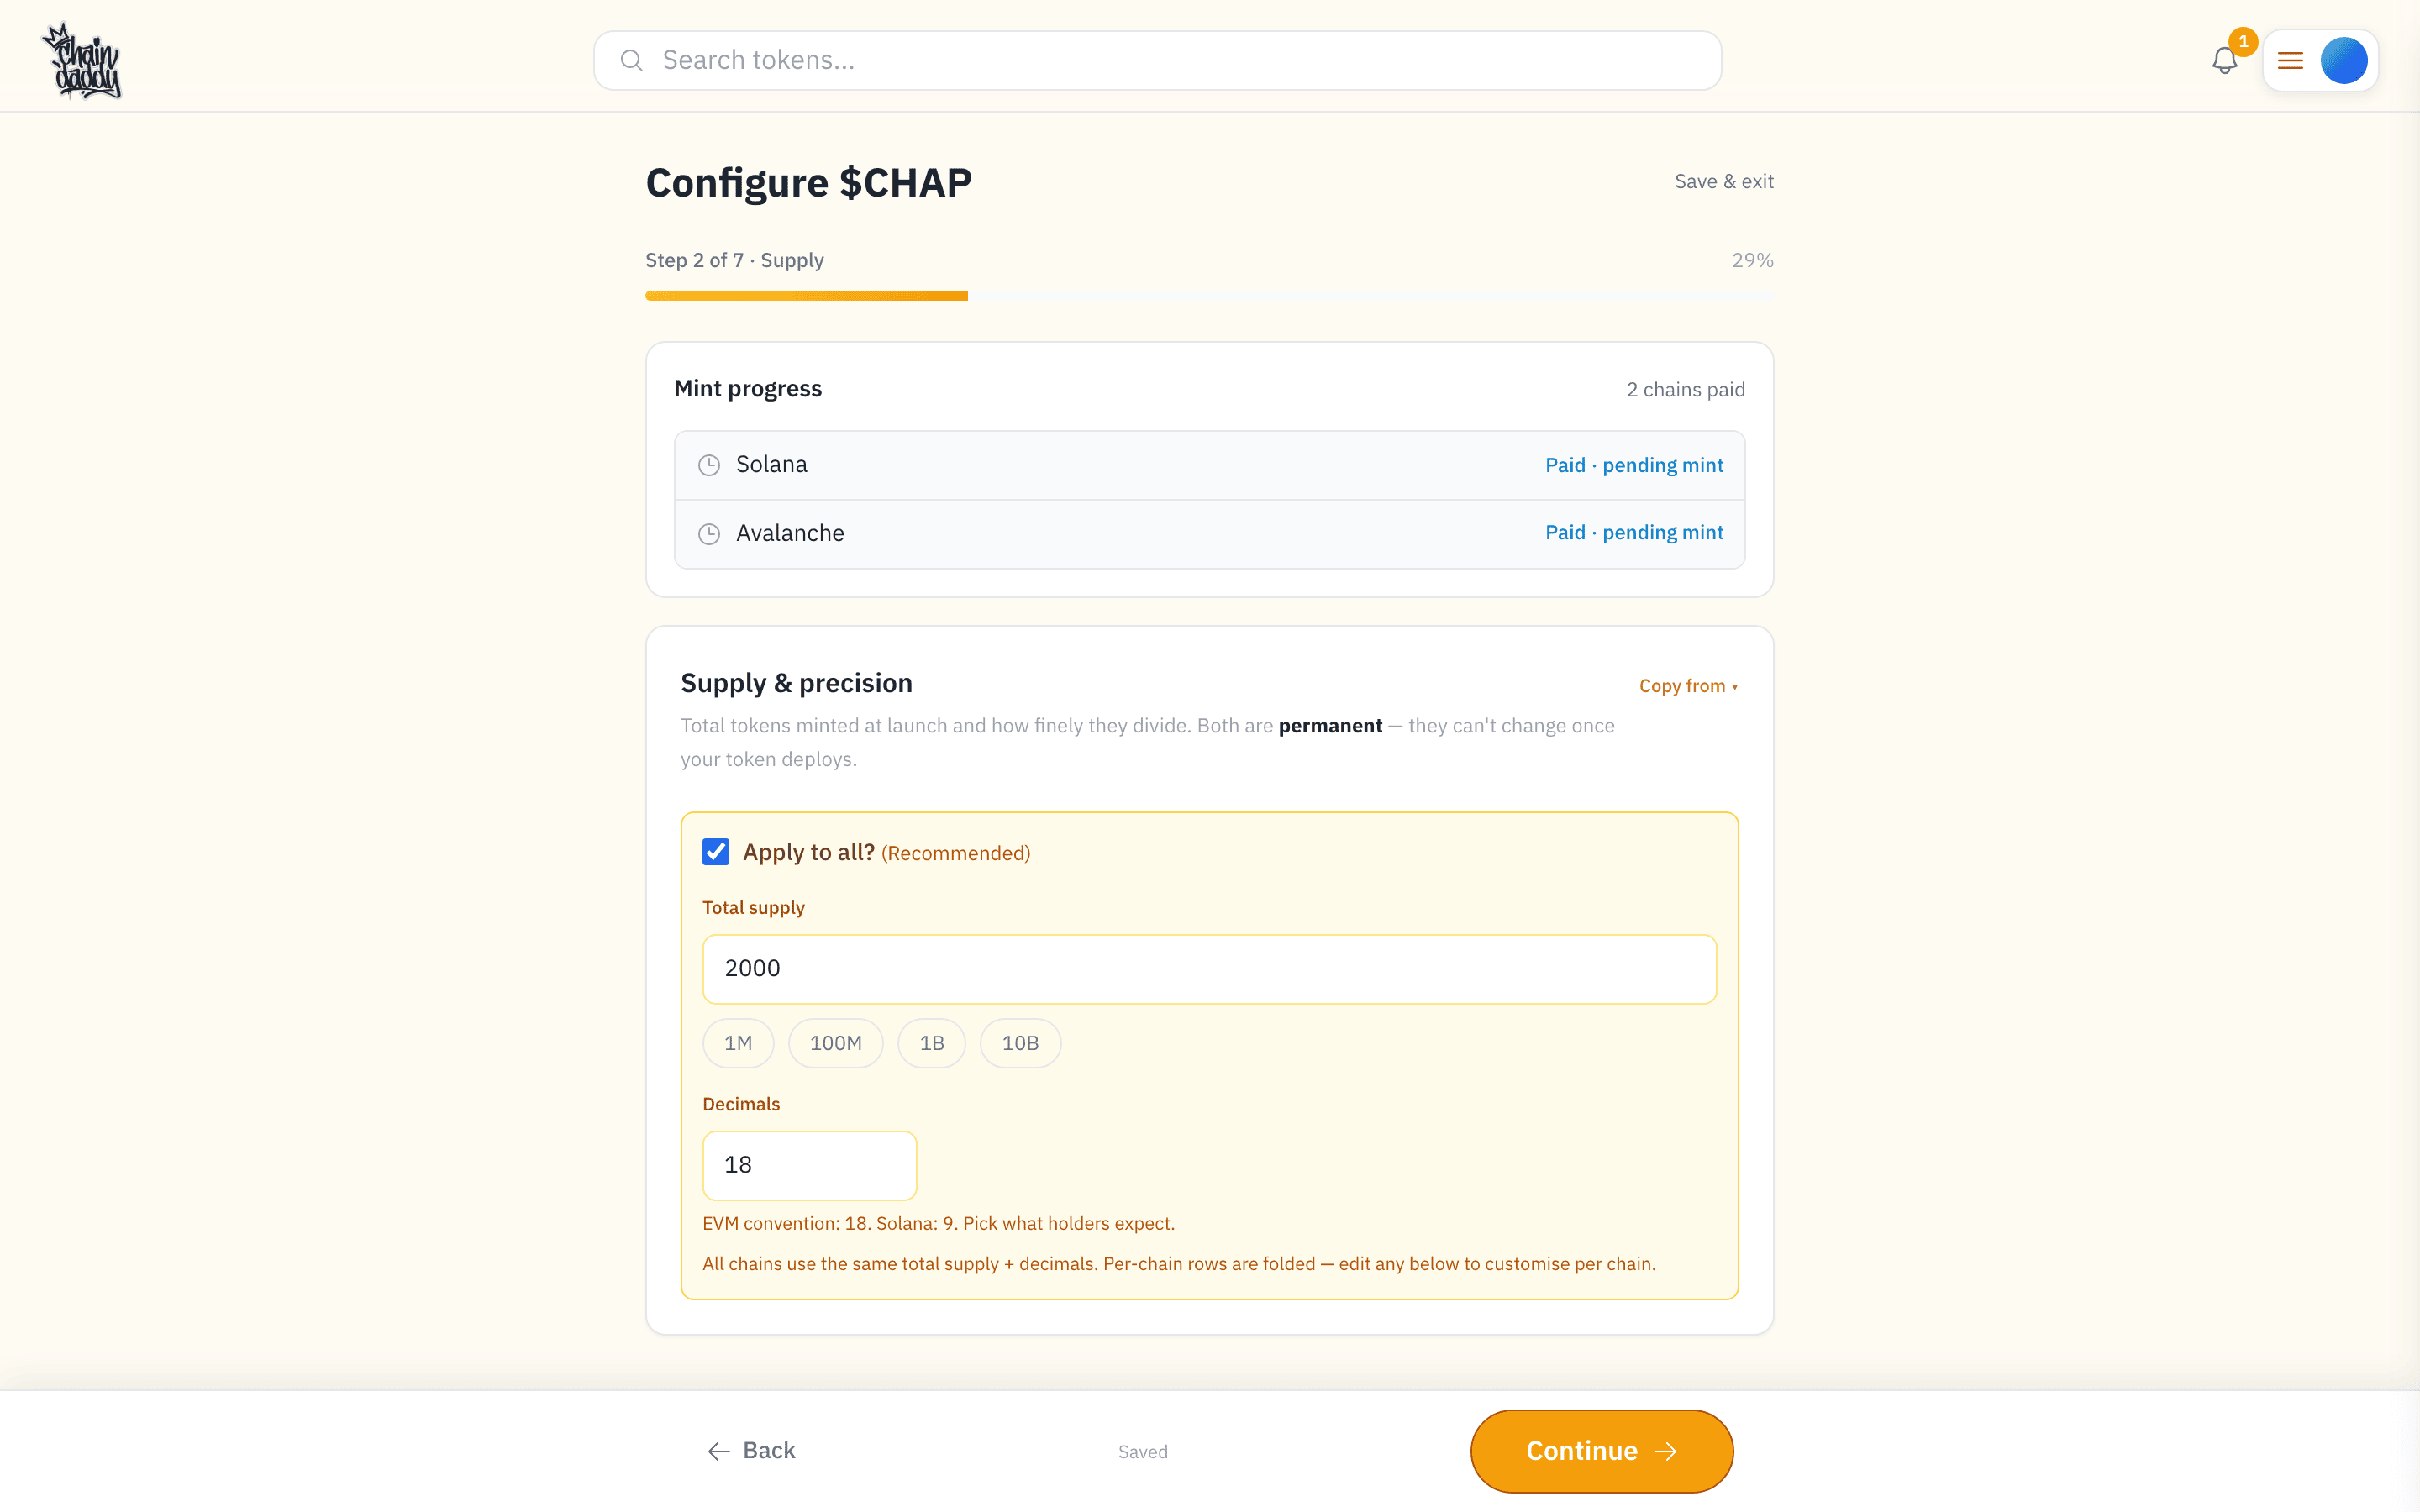
Set how many tokens mint at launch and how finely they divide. Both are permanent — they can't change once the token deploys.
- Total supply: total tokens minted to your wallet at launch. Quick presets: 1M / 100M / 1B / 10B.
- Decimals: how divisible each token is. The convention is 18 on EVM and 9 on Solana — pick what holders expect.
On a multi-chain order, an Apply to all toggle mints the same supply and decimals on every chain; uncheck it to set per-chain values.
Step 3: Token Settings
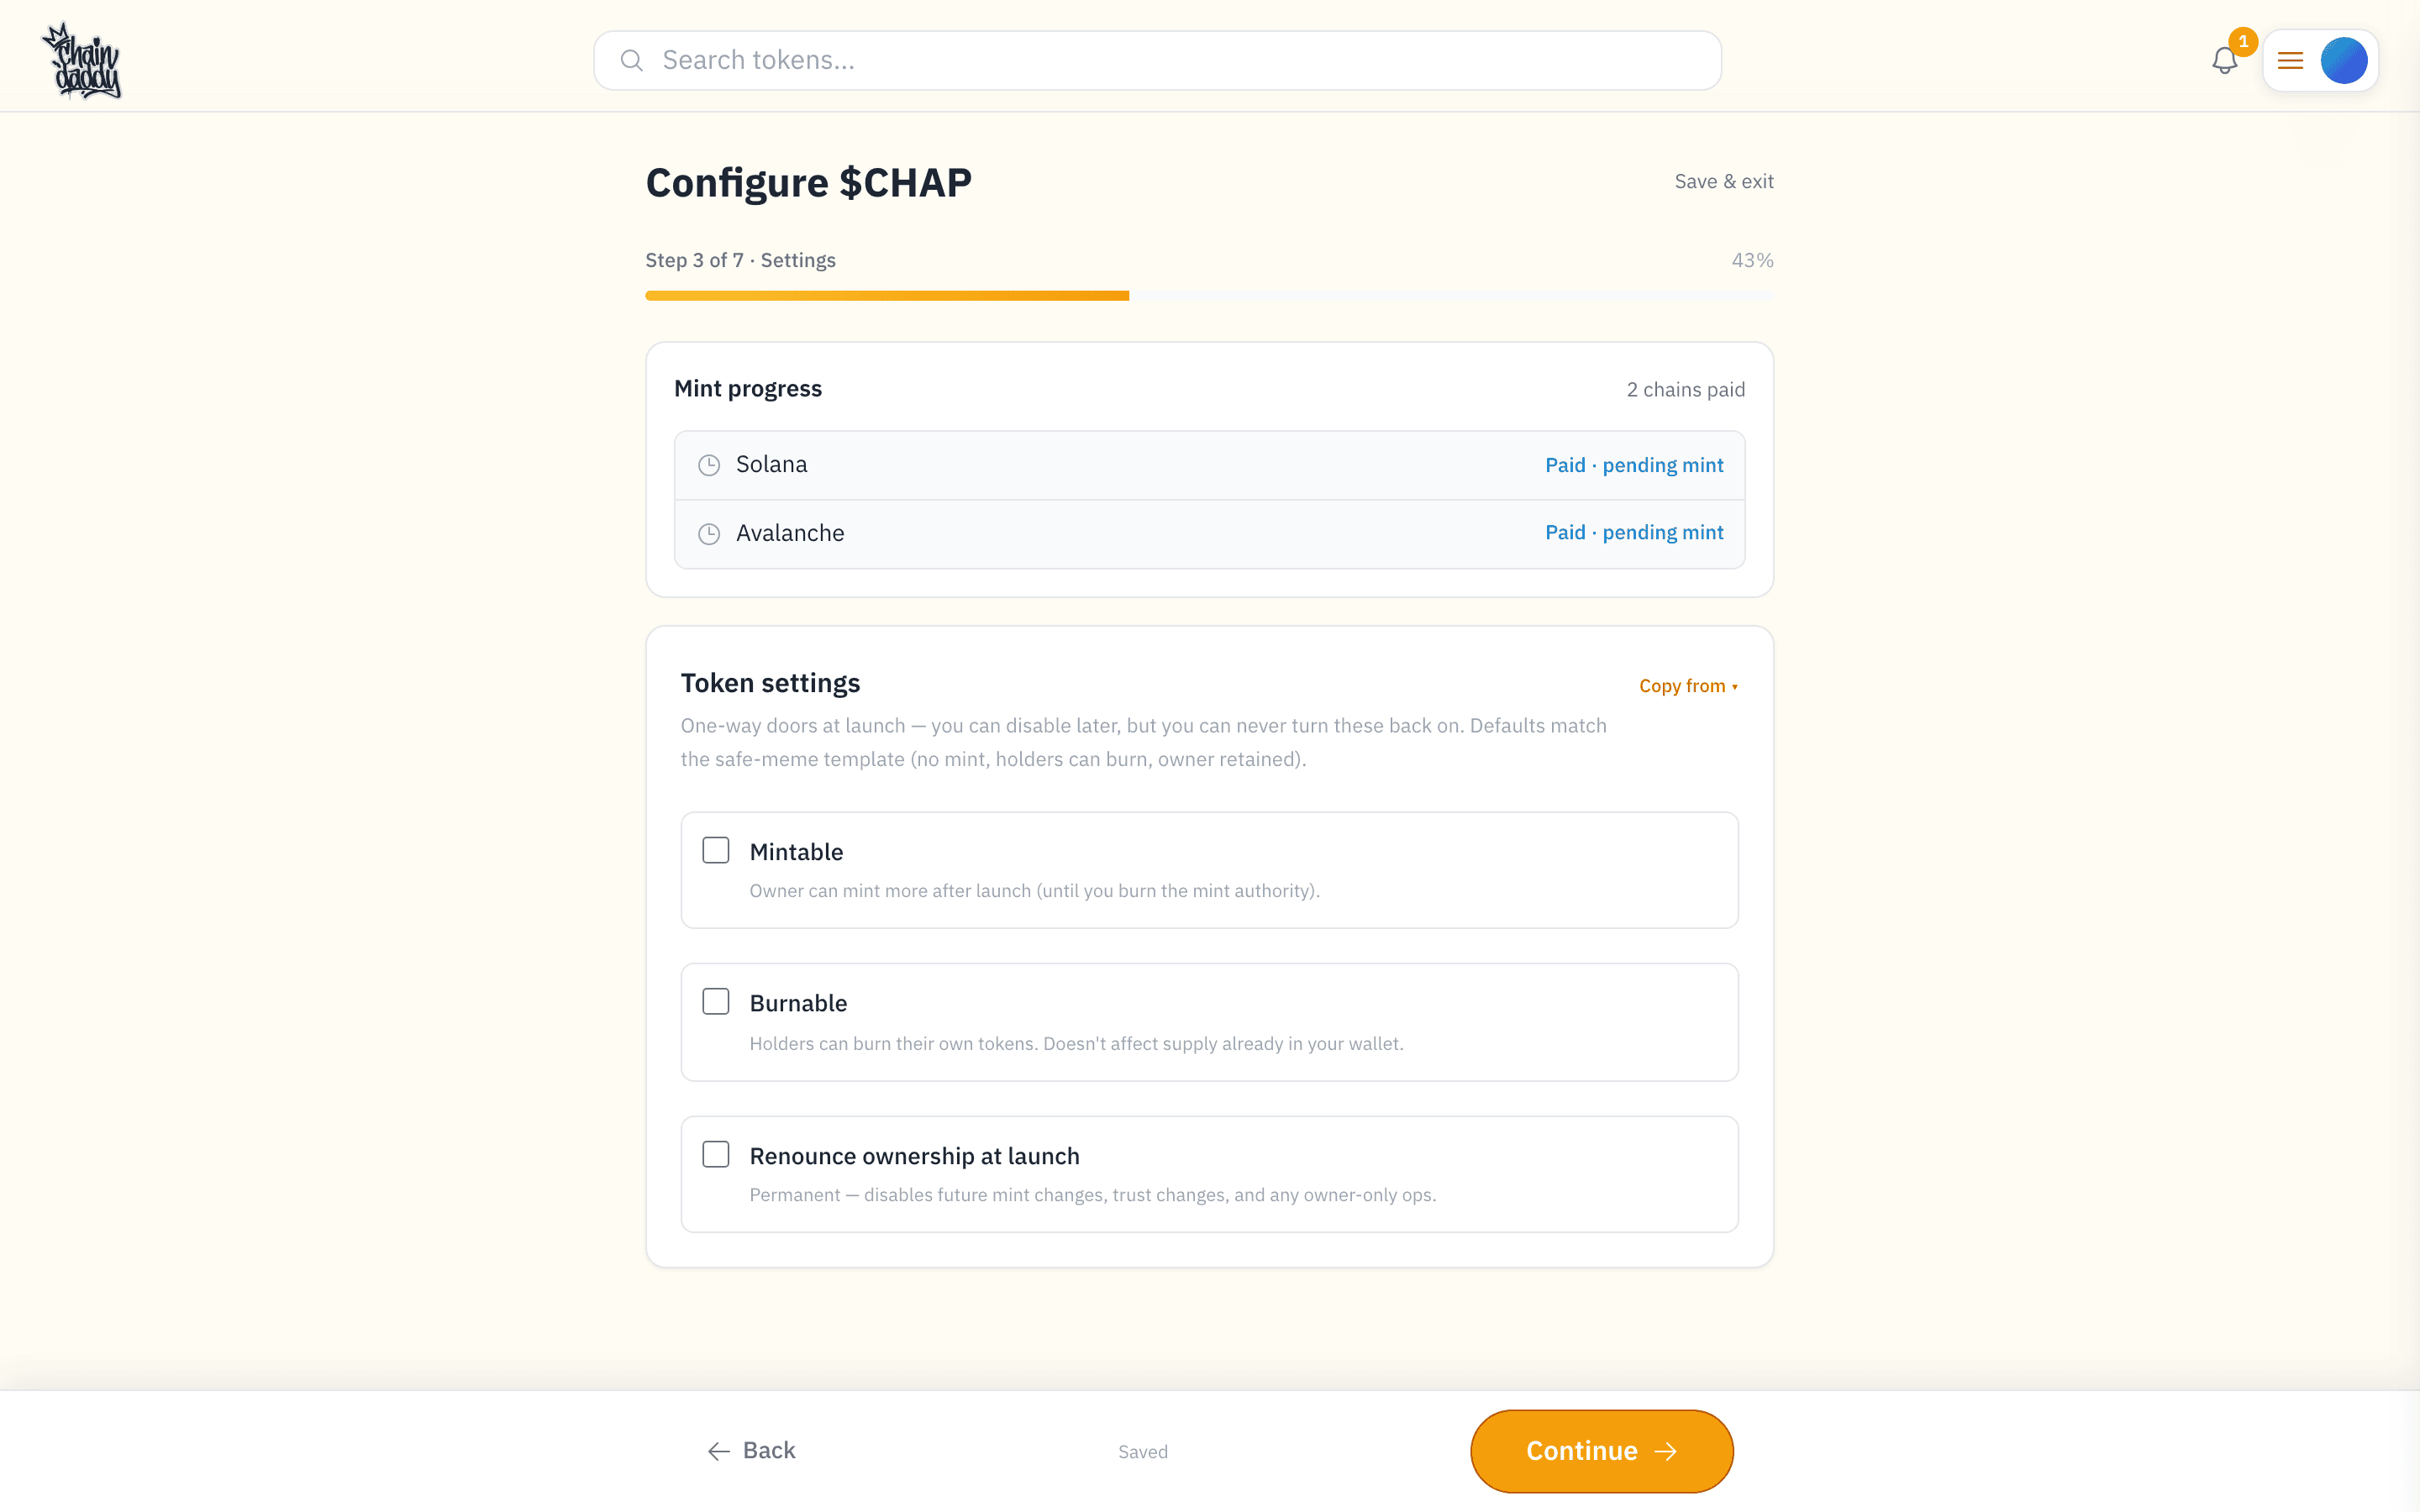
Choose your token's capabilities. These are one-way doors at launch — you can disable them later, but never turn them back on. The defaults match a safe-meme template: not mintable, holders can burn, owner retained.
- Mintable: lets the owner mint more after launch (until you burn the mint authority). Off by default for a fixed supply.
- Burnable: lets holders burn their own tokens. Doesn't touch the supply already in your wallet.
- Cap supply (only when mintable): caps how much can ever be minted — set a Max supply. Without a cap, "mintable" means uncapped.
- Renounce ownership at launch: permanently gives up all owner-only controls (future mint and trust changes). Irreversible.
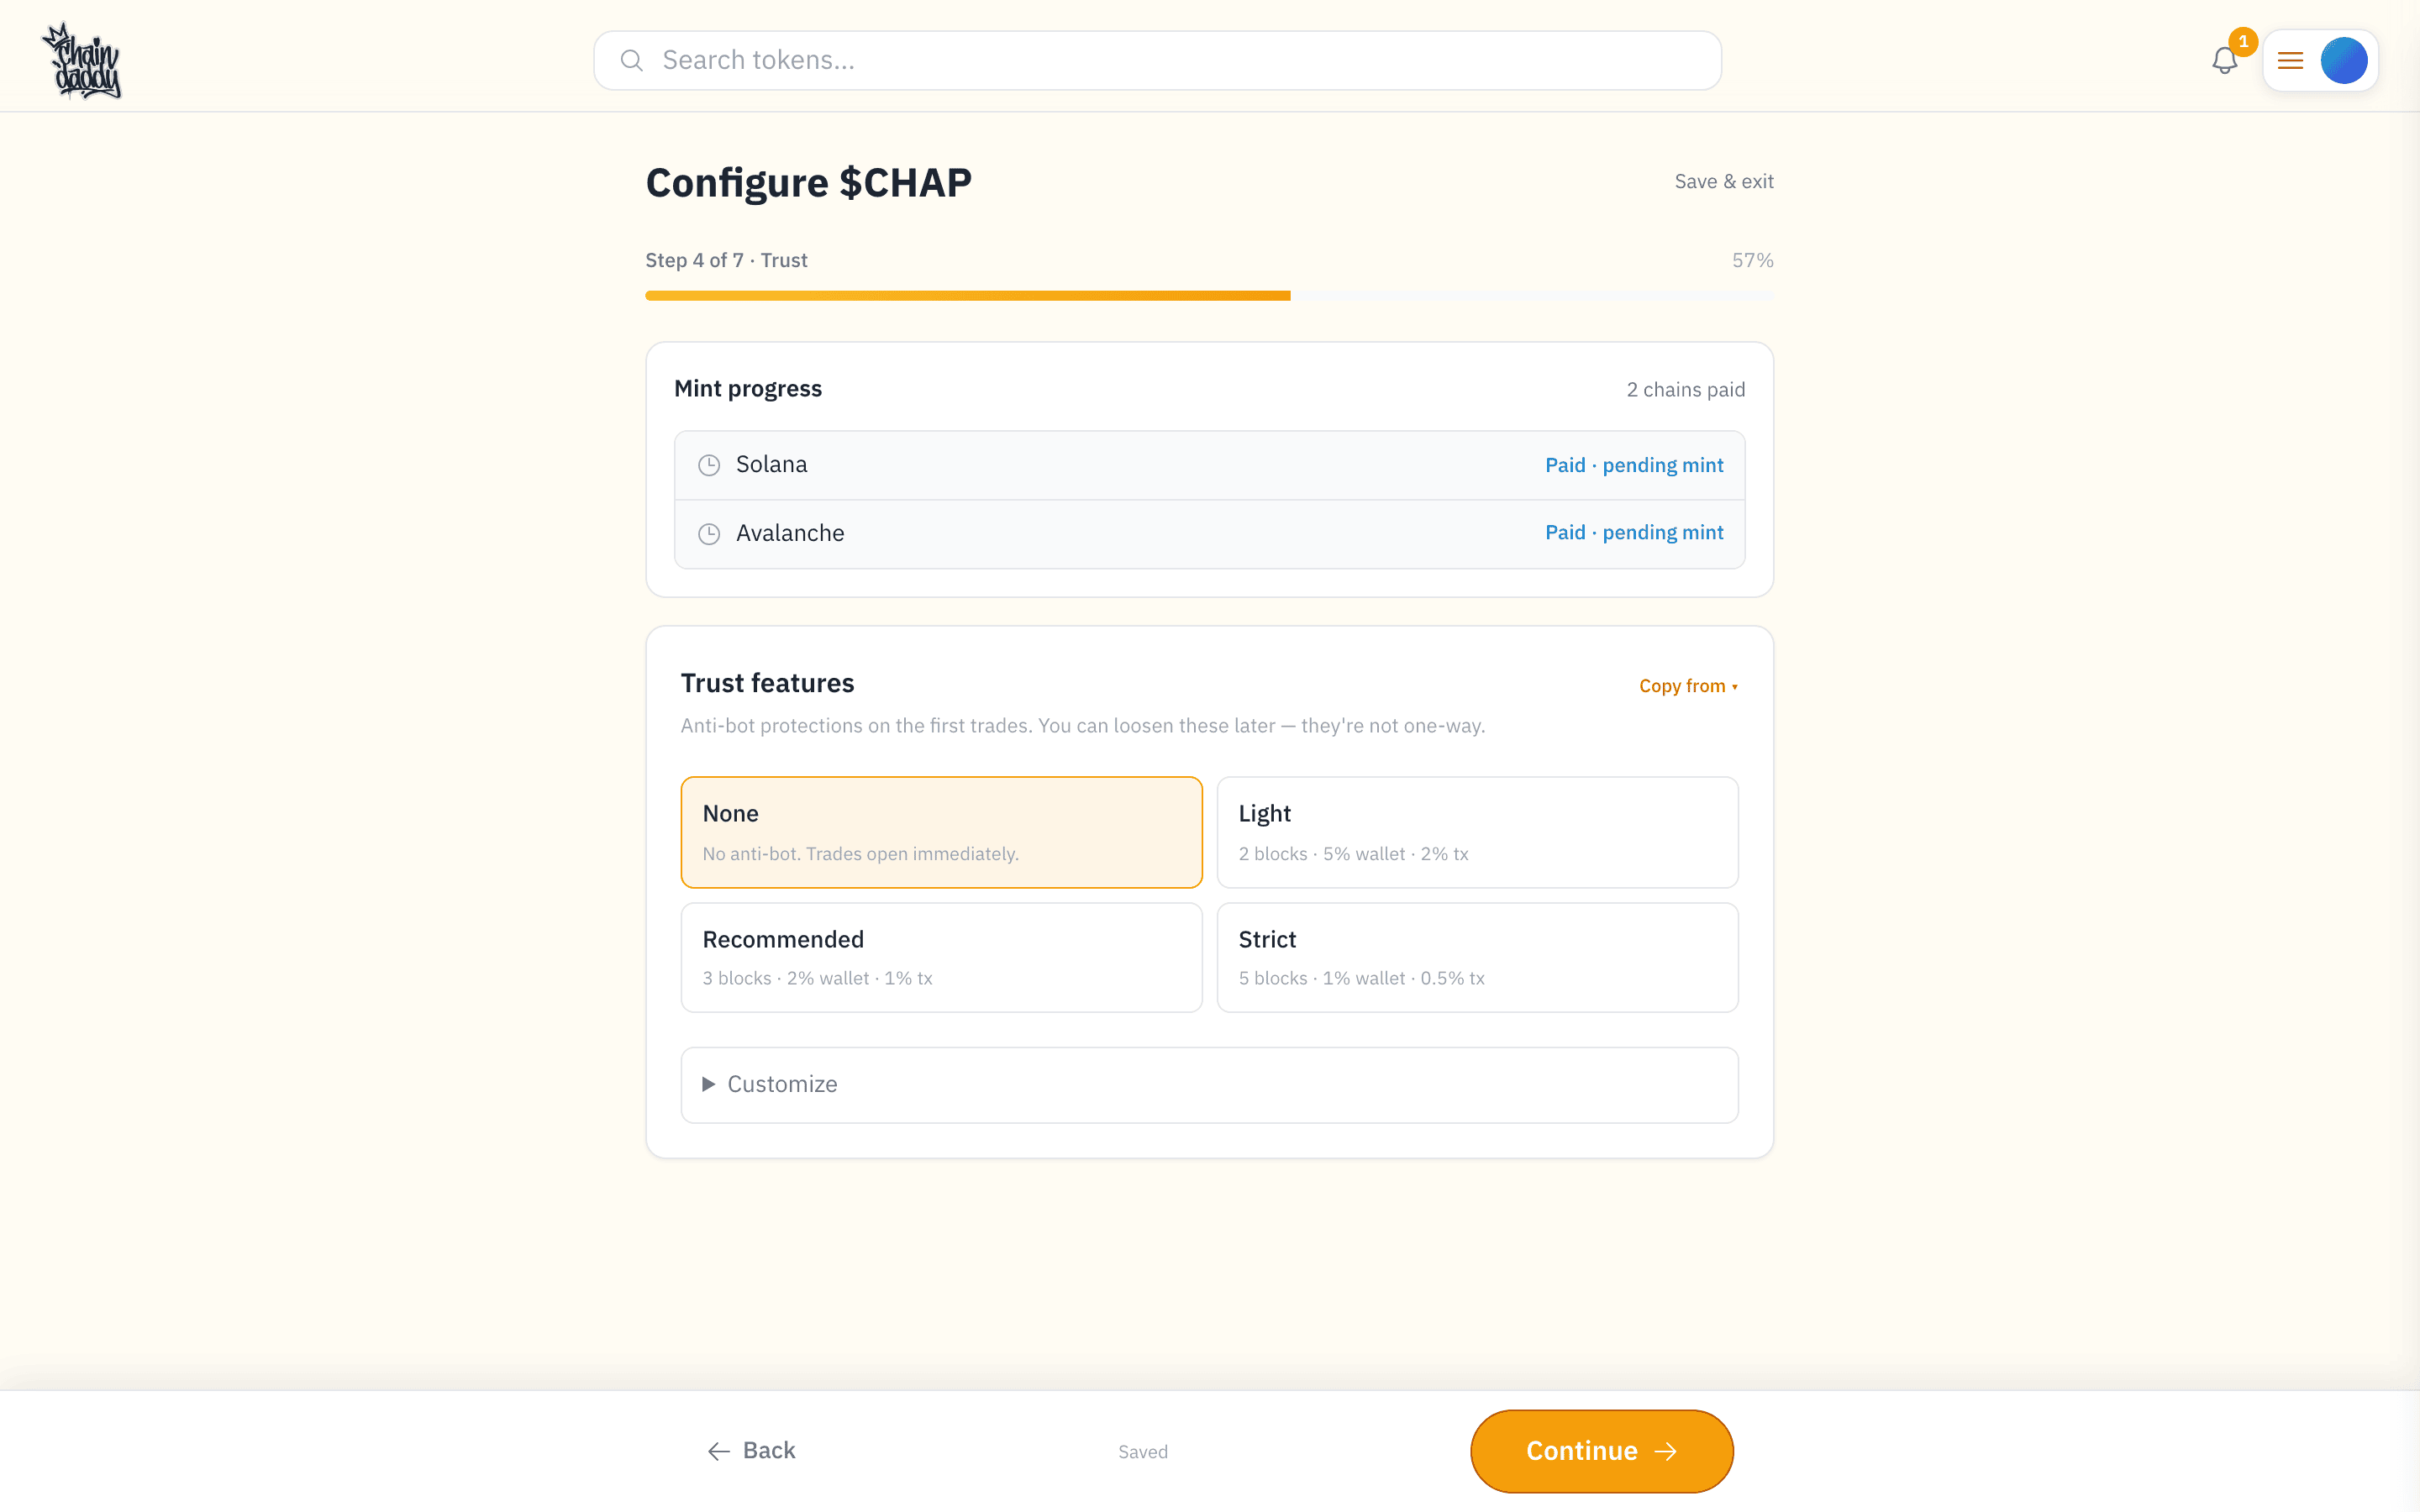
Step 4: Trust Features
Anti-bot protections for the first trades. Unlike the token settings above, these aren't one-way — you can loosen them later from your token manager.
Pick a preset — None, Light, Recommended, or Strict — or open Customize:
- Deadblocks (0–10): blocks after launch before trading opens, to shake off first-block snipers.
- Max wallet: the largest balance any one wallet may hold, in basis points (100 = 1%).
0disables it. - Max tx: the largest single trade, in basis points.
0disables it.
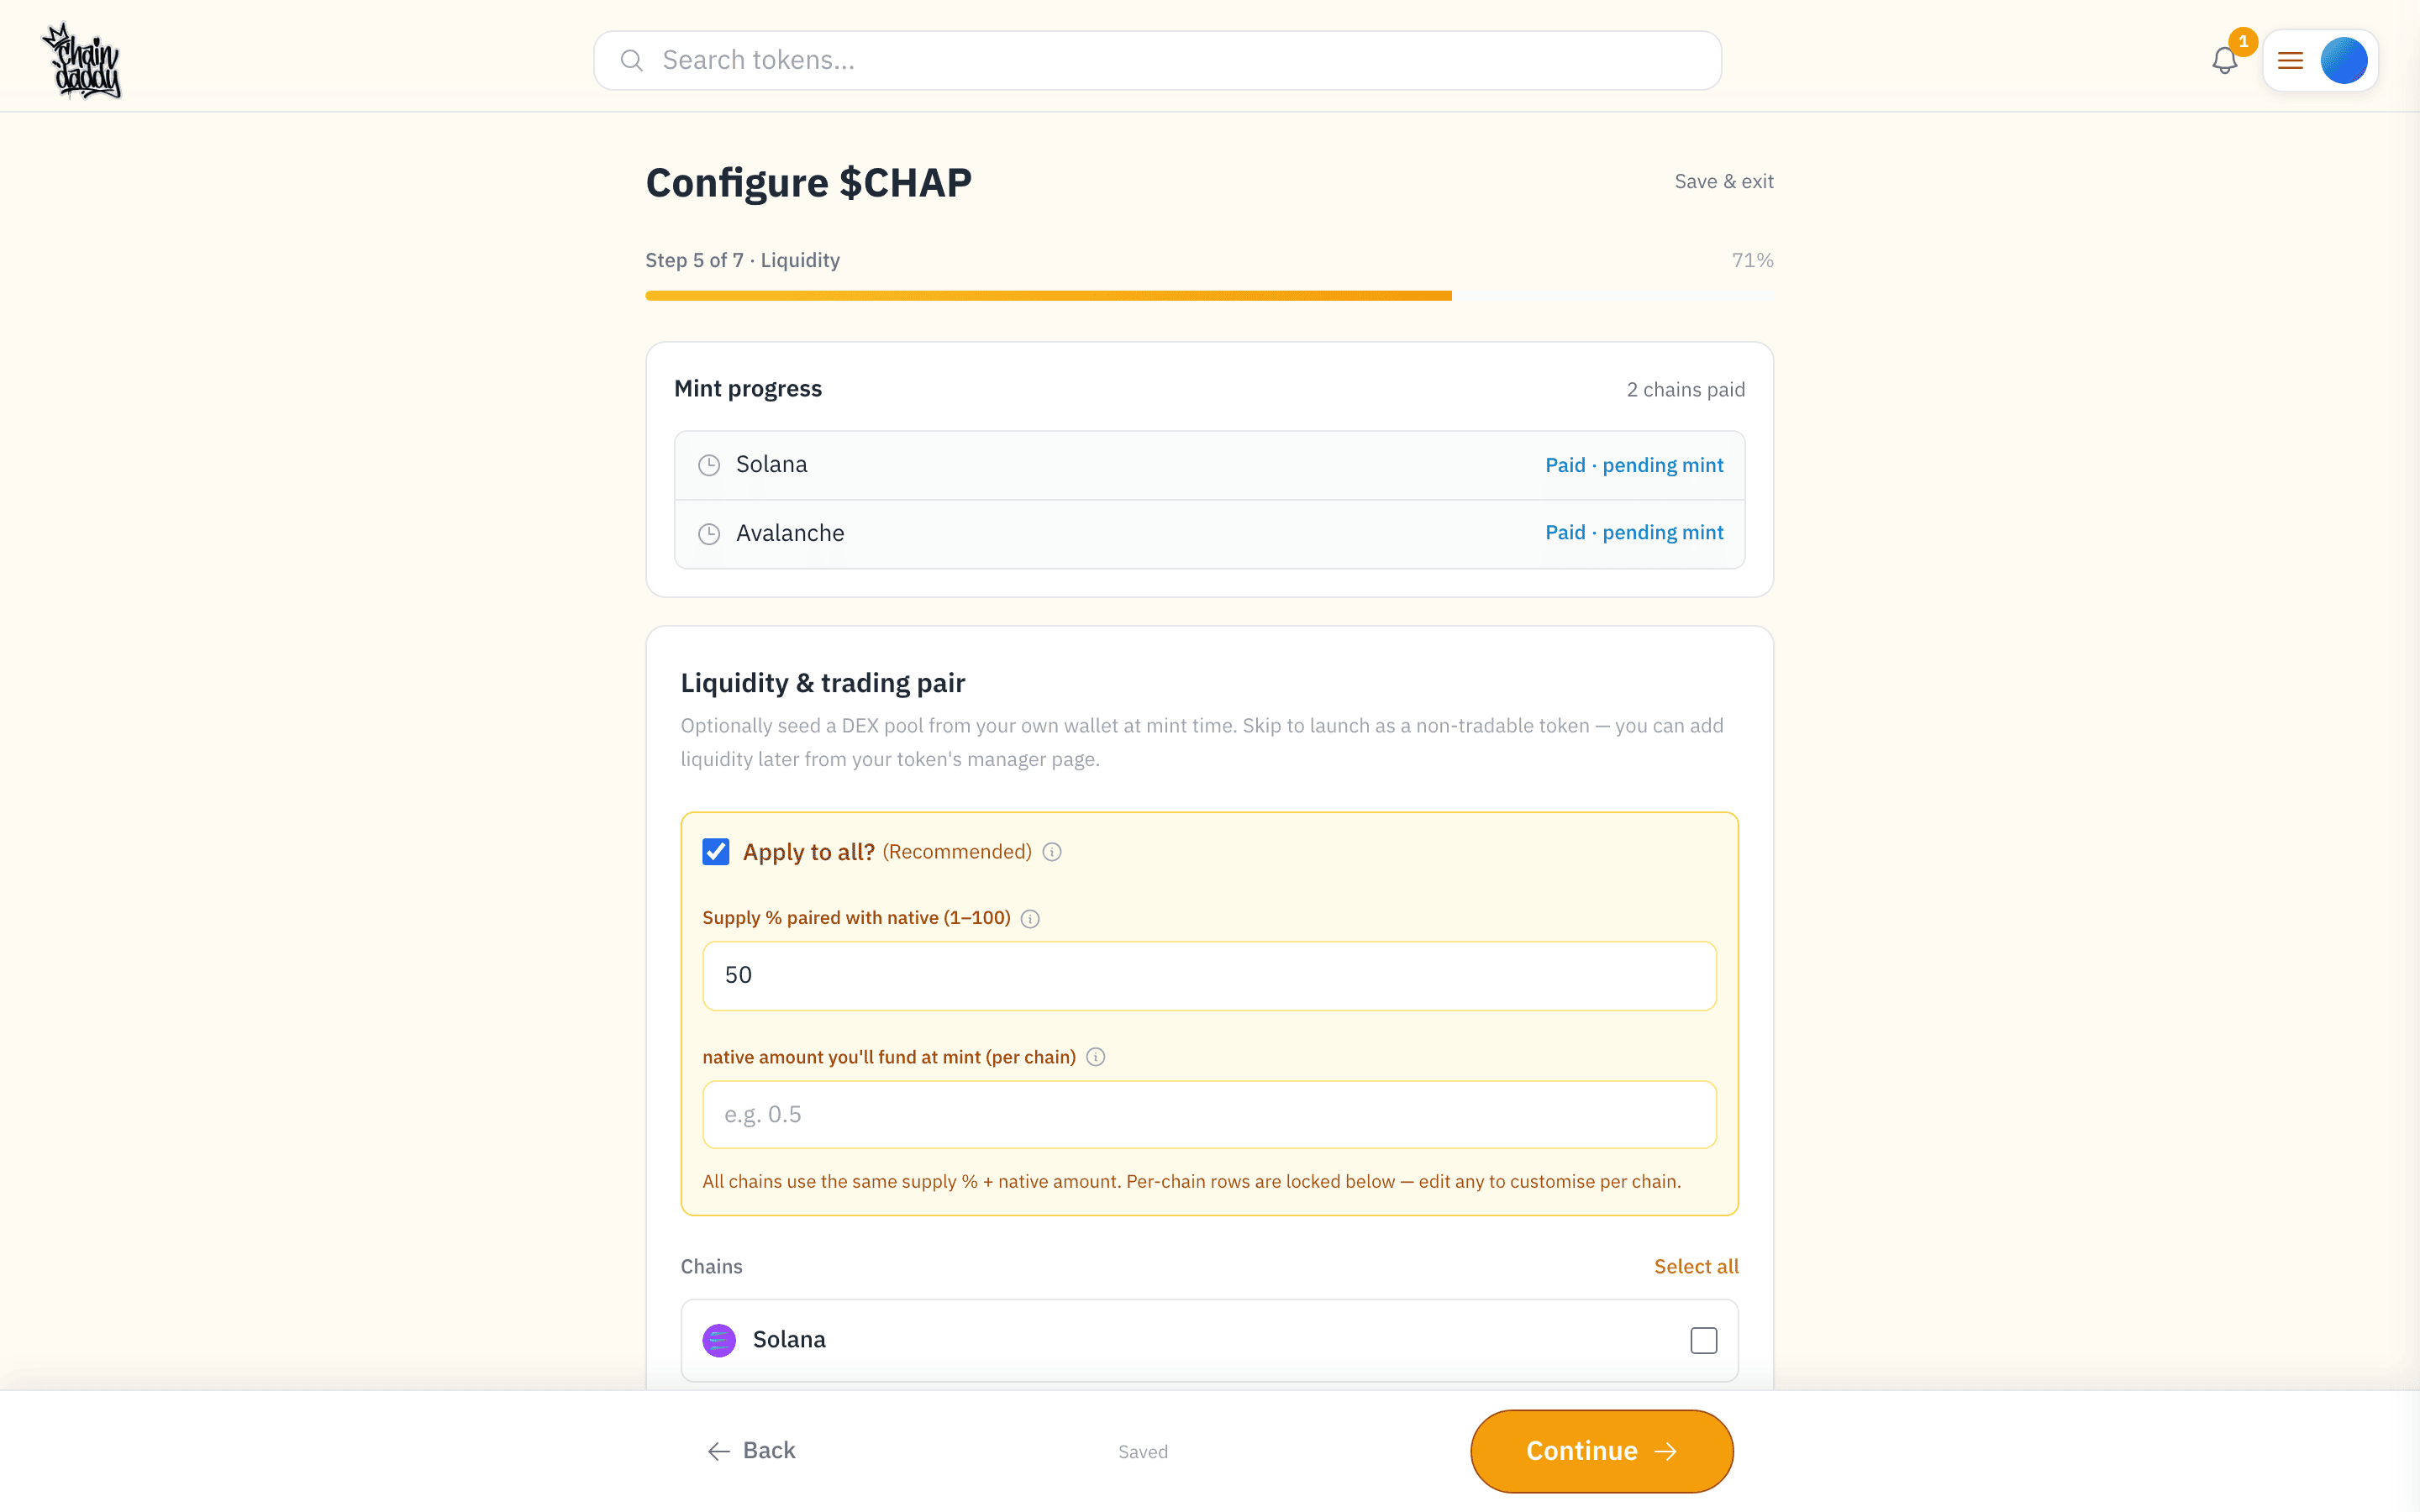
Step 5: Liquidity & Trading Pair
Optionally seed a DEX pool from your own wallet at mint time, so your token is tradable the moment it launches. Skip it to launch as a non-tradable token — you can add liquidity later from your token manager.
- Supply % paired: the portion of your total supply paired into the pool (the rest stays in your wallet). 50% is a common starting point — higher means deeper liquidity, lower keeps more tokens for you.
- Native amount to fund: how much of the chain's native token (ETH, SOL, …) you'll add at mint to pair with your tokens. This sets the opening price and is charged on top of gas.
On a multi-chain order, Apply to all uses the same split on every chain, or configure each chain individually.
Expanding a token you already own?
If you're launching a symbol you already hold on other chains, an extra Import step appears just before the summary — copy the branding and settings from a chain you've already configured so your new deployment matches.
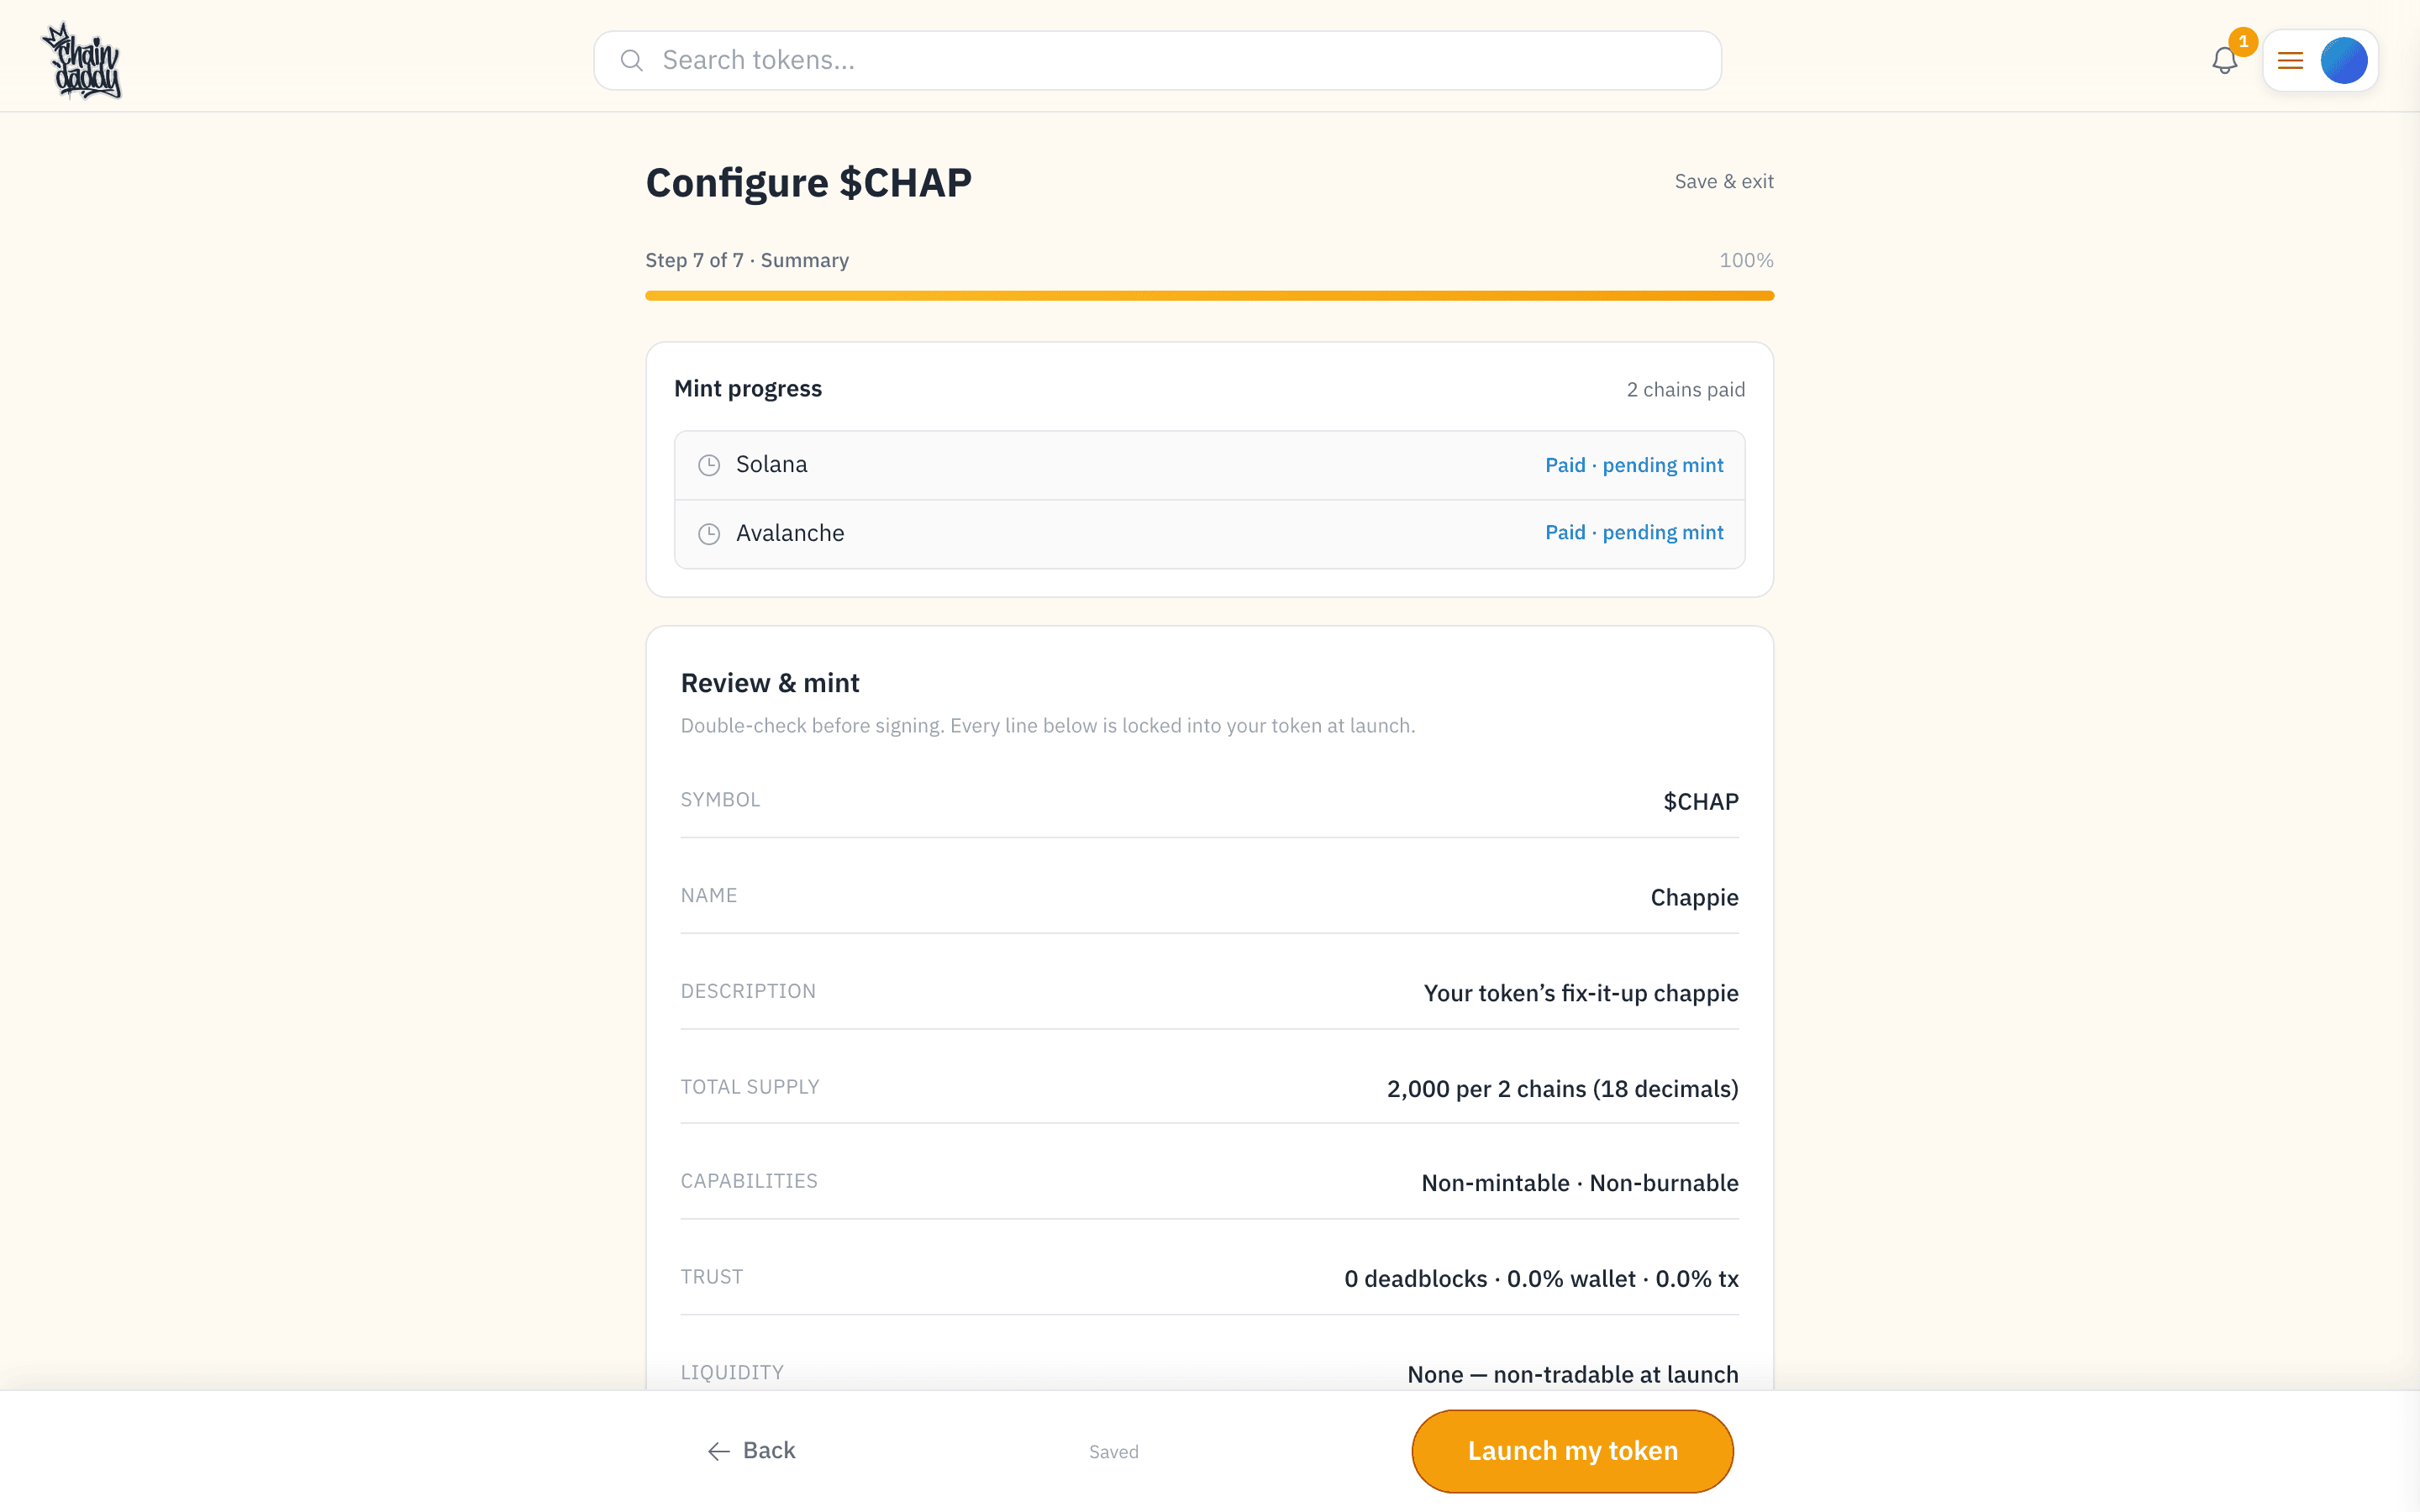
Step 6: Review & Mint
A final summary of everything — symbol, name, supply, capabilities, trust, and liquidity — with a clear note of what's permanent (symbol, total supply, decimals, and any "renounce ownership" choice) versus adjustable later from your token manager. Your order is already paid; from here you sign one transaction per chain and pay gas (plus any liquidity you chose to seed) from your connected wallet.
Notes
What can it do?
Once your token is live, it's yours to build on. Reward your community with token-gated perks and links, keep holders in the loop when you ship or drop, export your holder list for airdrops, and get it listed on the major platforms — whether it's a memecoin, a creator coin, or a community token.
Already Have a Token?
If your token already exists on-chain, claim it instead.
Supply Ownership
The full token supply is sent to the wallet that initiates creation. Distribute tokens as you see fit after deployment.
Under the hood
Each registration is a soulbound on-chain credential, internally called a "crown", that proves your ownership and can never be transferred without an announced deal. Most users never need to think about it; it just makes your token page yours.